Visual Studio Code is an interactive development environment (IDE) or simply, a code editor. You may hear Visual Studio Code referenced as VSCode or just code in the industry. VSCode is free to use for many types of development and supports various extensions for syntax checking and highlighting depending on the code language you are working with. For this lab, you will be working primarily with Python and YAML file types. One of the interactive aspects of an IDE when working with Python is being able to select a runtime interpreter, e.g. Python 3.8.2 or Python 3.9.2. In this lab, you will leverage VSCode as your code editor then, you will use GitLab's CI pipeline as your runtime environment.
The VSCode application that is opened on your desktop computers has its documents and terminal connected back to an Ubuntu virtual machine (VM) in RTP, North Carolina. VSCode is providing the code editor frontend while the Ubuntu VM is acting as the file hosting environment. In essence, you will be developing locally, but running through the pipeline.
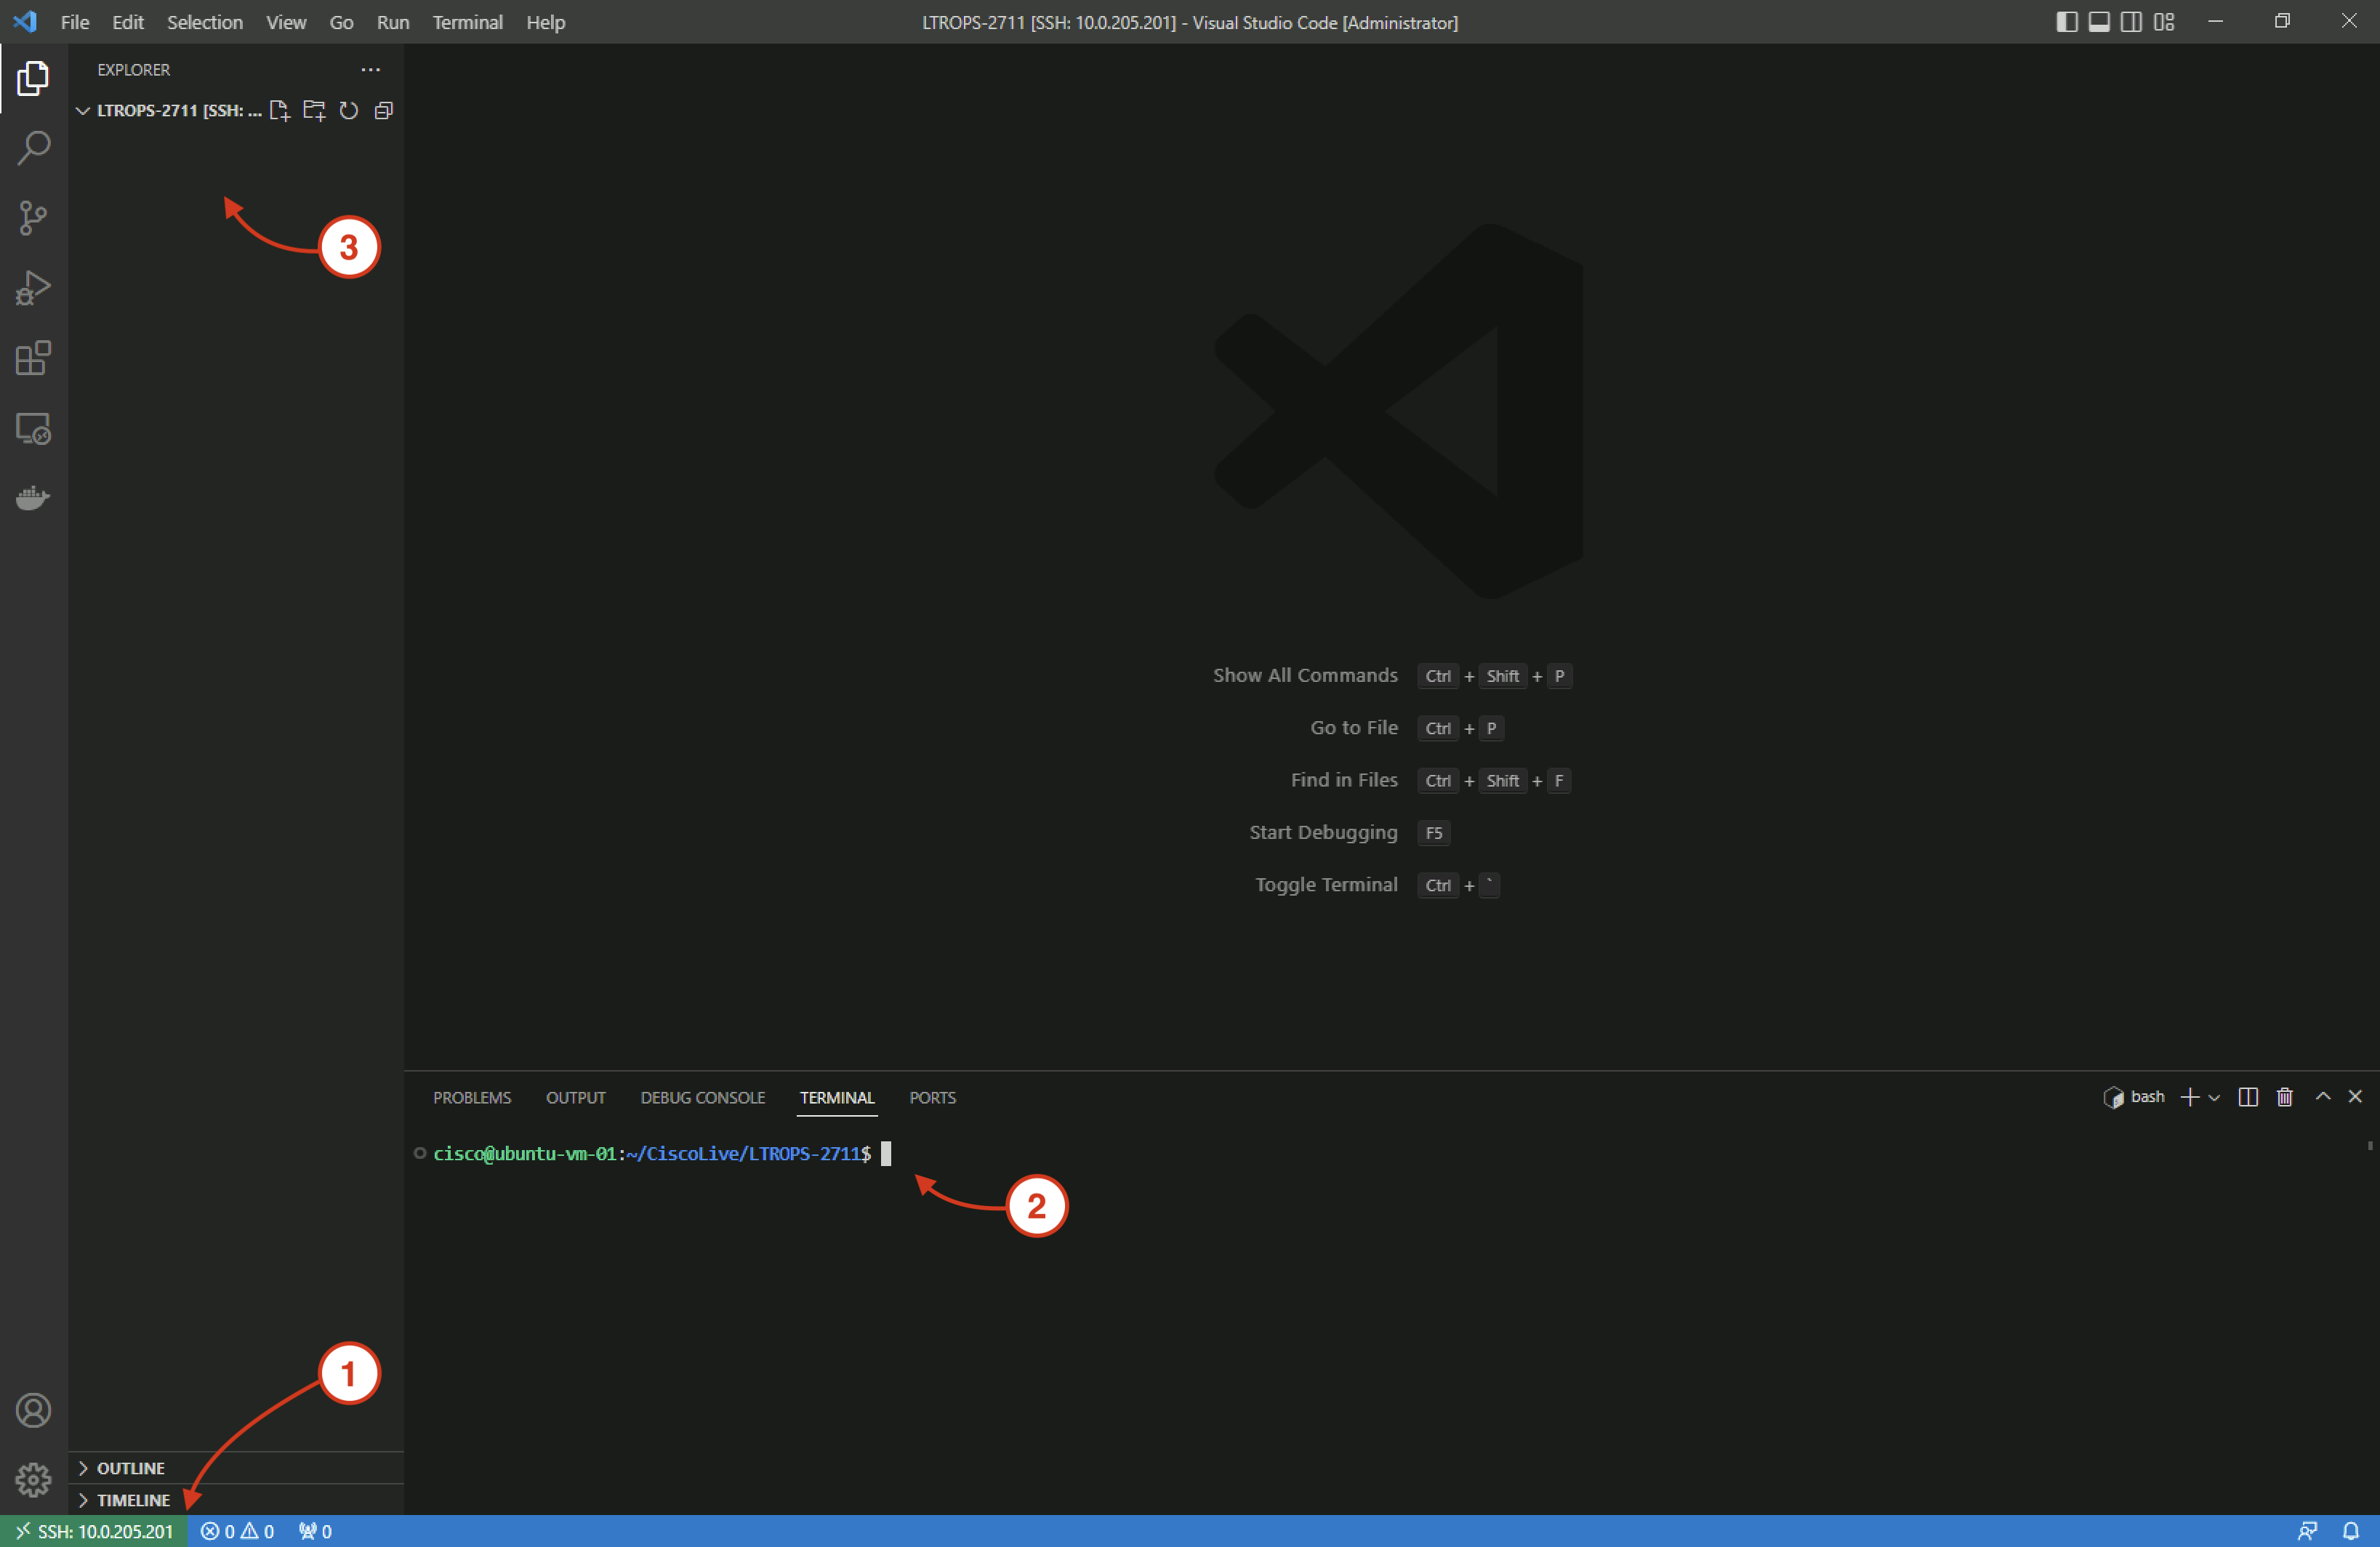
In your VSCode, make note of these three main areas on the screen:
Set your Git global settings for your user:
      git config --global user.name "POD-25"
      git config --global user.email "pod25@ciscolive.com"
      git config --global init.defaultBranch main
Initialize your local project directory as git repo:
git init
Add the remote pointer to your Git repo:
git remote add origin git@10.0.205.200:CL-POD25/LTROPS-2711.git
In Git repos, it is very common to have a hidden file called .gitignore. This is a reserved filename and it is used to
ignore specific file extensions and/or directories from being added to the Git repo. The file below serves as an example of a few
items you would want to ignore.
      touch /home/cisco/CiscoLive/LTROPS-2711/.gitignore
      cat <<EOF >> /home/cisco/CiscoLive/LTROPS-2711/.gitignore
      *.env

      # VScode
      .vscode/*

      # Byte-compiled / optimized / DLL files
      __pycache__/
      *.py[cod]
      *$py.class

      # pyenv
      .python-version
      EOF
In your Terminal window you should be at the top level of your project directory. Create a directory called ansible and a directory called tests. The ansible directory will be used for your configuration change playbook and the tests directory will be used for a Python script to drive CXTM's API you will write to drive the testing stages of your pipeline.
        cd /home/cisco/CiscoLive/LTROPS-2711/
        mkdir /home/cisco/CiscoLive/LTROPS-2711/ansible
        touch /home/cisco/CiscoLive/LTROPS-2711/ansible/.keep
        mkdir /home/cisco/CiscoLive/LTROPS-2711/tests
        touch /home/cisco/CiscoLive/LTROPS-2711/tests/.keep
Within the ansible directory create three more directories; group_vars and roles. These directories align to Ansible best practices for where specific YAML files will be placed.
        mkdir /home/cisco/CiscoLive/LTROPS-2711/ansible/group_vars
        touch /home/cisco/CiscoLive/LTROPS-2711/ansible/group_vars/.keep
        mkdir /home/cisco/CiscoLive/LTROPS-2711/ansible/roles
        touch /home/cisco/CiscoLive/LTROPS-2711/ansible/roles/.keep
Create an ansible.cfg file to disable hostkey checking and set your python interpreter for the purposes of this lab.
        touch /home/cisco/CiscoLive/LTROPS-2711/ansible/ansible.cfg
        cat <<EOF >> /home/cisco/CiscoLive/LTROPS-2711/ansible/ansible.cfg
        [defaults]
        interpreter_python = "~/.pyenv/shims/python"
        host_key_checking = False

        [persistent_connection]
        command_timeout=100
        connect_timeout=100
        EOF
Copy the below YAML into the your Terminal window to create the all.yml file and populate contents of the file
for the ansible_connection and username/password information.
This is a file with key/value pairs. group_vars/all is where you place universal variables that apply for all devices.
For all your devices, you will make the configuration changes over the CLI, so you will leverage Ansible's netcommon.network_cli plugin.
For passwords, it is best practice to leverage something like Ansible Vault. For simplicity, clear text is used.
        touch /home/cisco/CiscoLive/LTROPS-2711/ansible/group_vars/all.yml
        cat <<EOF >> /home/cisco/CiscoLive/LTROPS-2711/ansible/group_vars/all.yml
        ---

        ansible_connection: ansible.netcommon.network_cli
        ansible_user: admin
        ansible_ssh_pass: cisco.123
        EOF
For Ansbile to know what devices to connect, you must define an inventory file, much like the topology file that was created to drive CXTM. In reality, these two files could be dynamically generated from a single-source of truth if preferred. For Ansible, to use the specific OS modules, each device requires the ansible_network_os to be defined.
        touch /home/cisco/CiscoLive/LTROPS-2711/ansible/hosts.yml
        cat <<EOF >> /home/cisco/CiscoLive/LTROPS-2711/ansible/hosts.yml
        ---
        # hosts file for Ansible playbook
        all:
          children:
            xe:
              hosts:
                csr1kv:
                  ansible_network_os: cisco.ios.ios
                  ansible_host: 10.15.125.11
                c8kv:
                  ansible_network_os: cisco.ios.ios
                  ansible_host: 10.15.125.12
            xr:
              hosts:
                xr9kv:
                  ansible_network_os: cisco.iosxr.iosxr
                  ansible_host: 10.15.125.13
            nx:
              hosts:
                n9kv:
                  ansible_network_os: cisco.nxos.nxos
                  ansible_host: 10.15.125.14
        EOF
After initializing your Git repo and creating the directories and files, it is time to add these to your repo.
You perform the action of adding files with git add.
      git add ansible/
      git add tests/
      git add .gitignore
With your directories and files added, you can now commit them to your Git repo with git commit.
The -m option is for a comment/message for the comment.
git commit -m "Initial commit"
Finally, with your project directory initialized as a Git repo, your files added and committed, you can push everything to your Git repo on the GitLab instance.
git push -u origin main
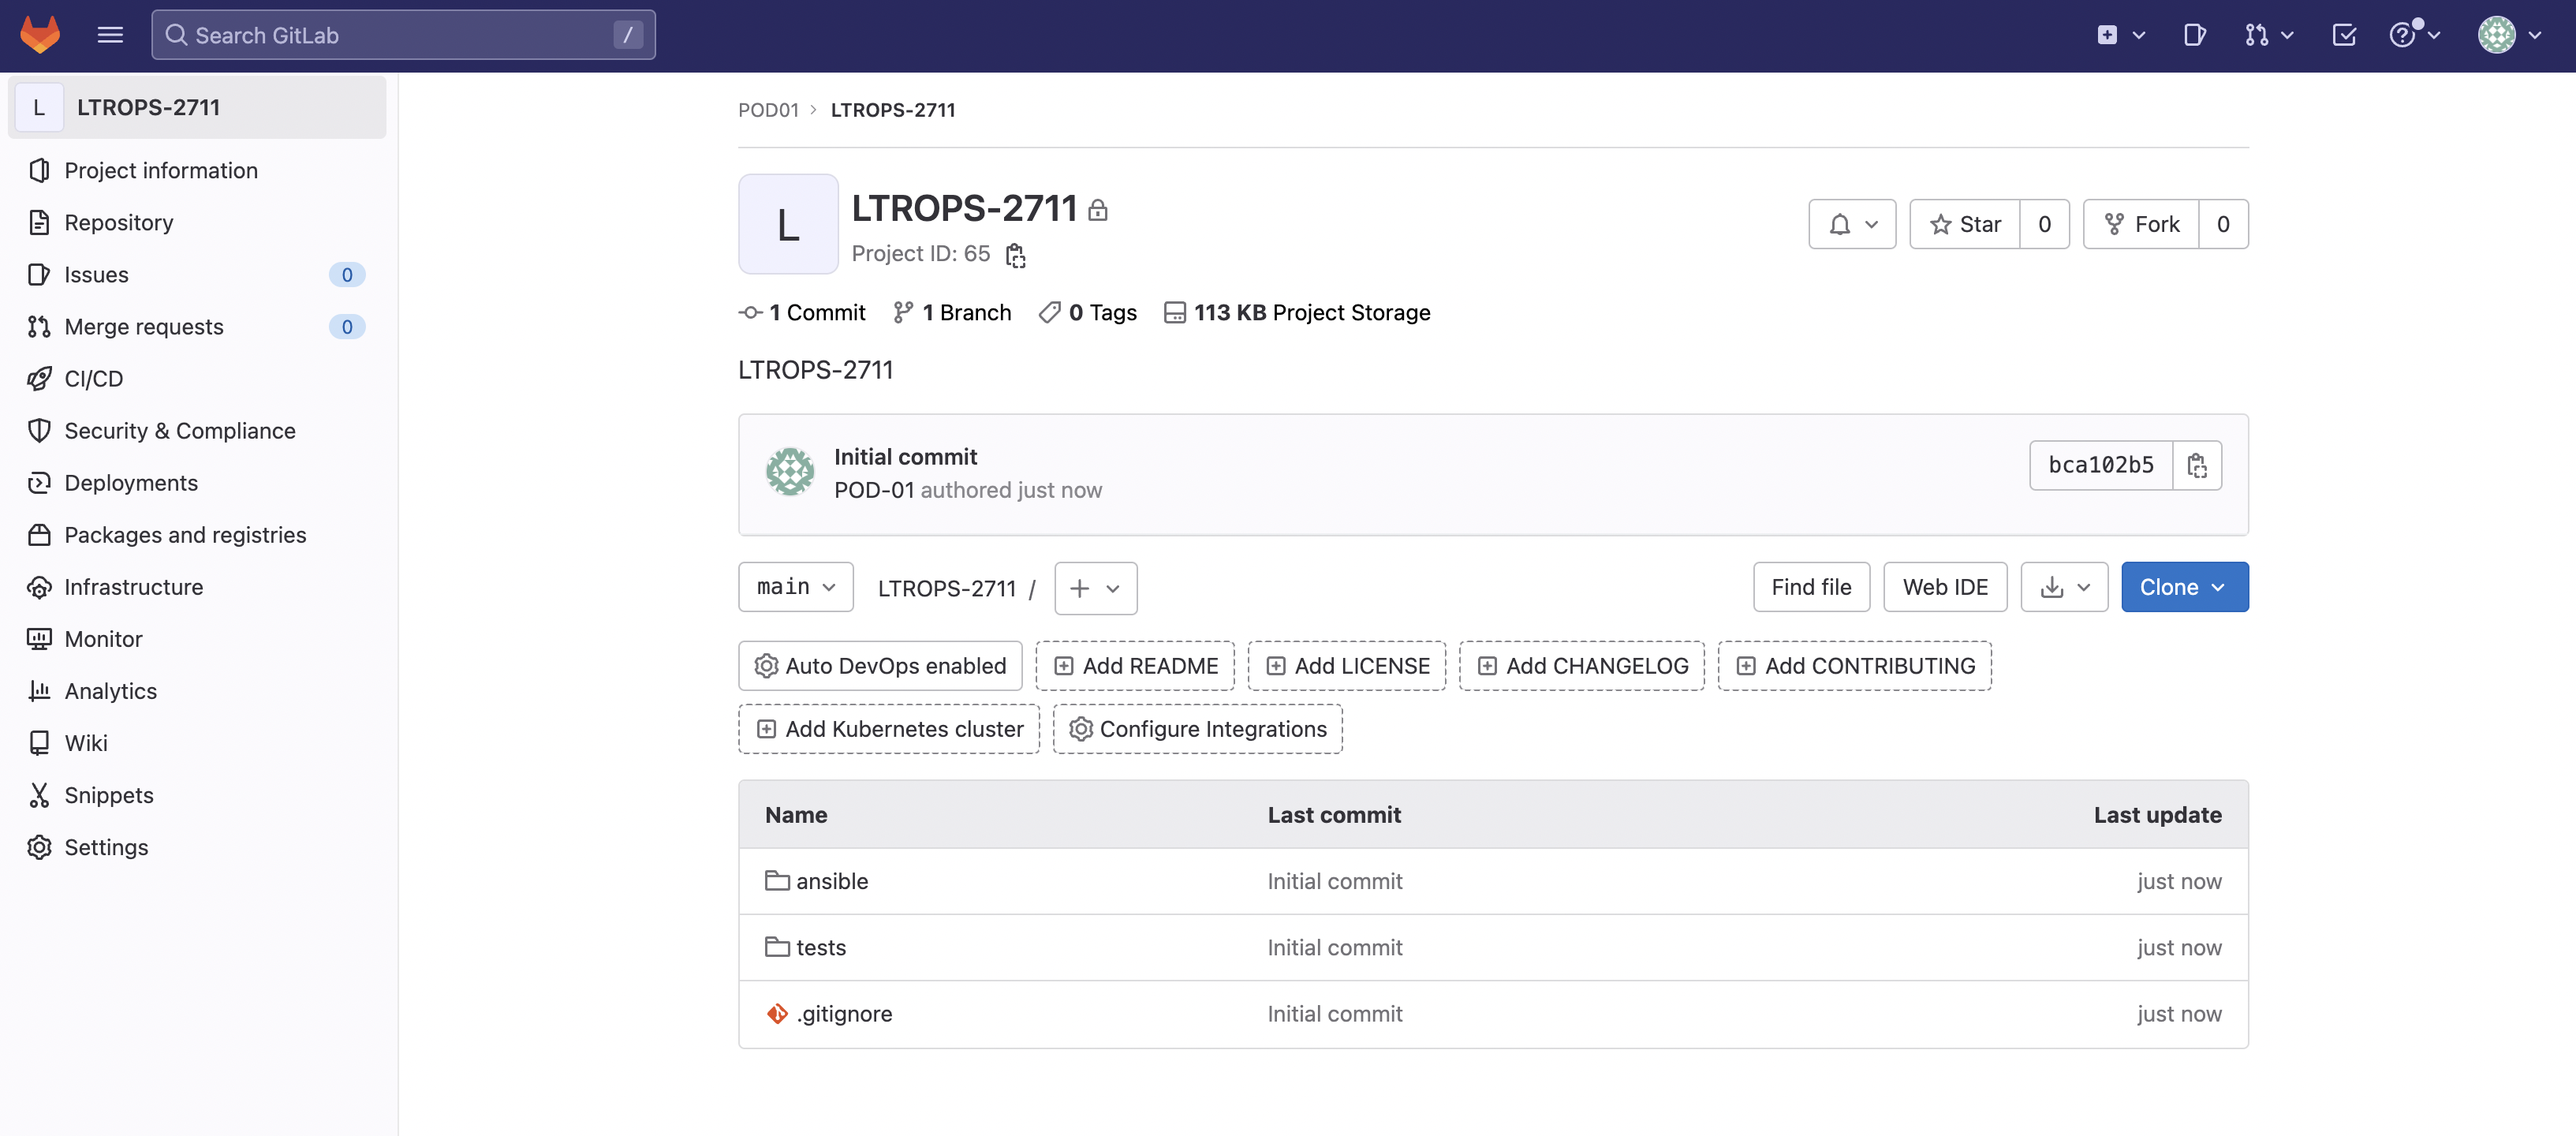
Return to GitLab. Your may have to refresh the browswer window.
Your GitLab repo should now looks similar to the screenshot below with the directories and files you just pushed now stored in source control:
Continue to the next section to create your Infrastructure-as-Code (IaC) configuration change playbook.